
Editor’s note: Greg Blanchard is a traveling physical therapist who has been navigating the country the last six years. When he’s not working, you’ll find Greg fishing out of his kayak and creating YouTube videos for his channel, which is nearing 40,000 subscribers. He’s passionate about filming his experiences and introducing others to the world of kayak fishing.
It’s almost too late to say that we’re at the start of a kayak-fishing boom. It seems that boom has already matured, but the growth is continual, and it shows no signs of stopping. We’re seeing more advanced fishing kayaks on the market, more gear specifically for kayak anglers and advancement in the technology that we as kayak anglers have at our fingertips.
One of the biggest aftermarket purchases a kayak angler can make is a fish finder. At the start of the kayak-fishing boom, many laughed at the idea of putting a graph on a kayak. Now, it seems almost standard practice, especially for the avid kayak angler.
With so many options out there, choosing one can almost seem just as overwhelming as picking a kayak to fish from. What features do I need? What brand should I get? How much should I spend?
All questions I hope to answer.
What do I need?
Modern units come with various combinations of sonar and GPS. What you choose really depends on how you fish. For advanced anglers, this information is simple, and you can skip ahead. For beginners, here’s a brief explanation of what’s out there.
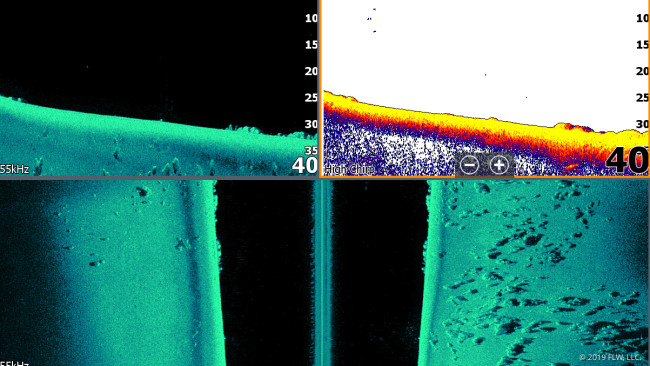
Universally, depth and water temperature read-outs are always going to come in handy. Regular sonar will show fish, rocks, grass and other things of interest and is a good all-around choice. Down imaging takes a detailed picture of what you’re seeing so you can easily distinguish between fish and things that aren’t fish. It’s a step above typical sonar. GPS mapping is important in most cases, too, and opens up mapping options.
Personally, I enjoy having a unit that has both down imaging and a GPS function. Down imaging truly comes in handy when figuring out the details of your screen. Having a GPS function also allows you to mark your exact location (waypoints), which can be convenient once you find a new honey hole or a piece of structure that may otherwise be difficult to locate in the future. I’ve found myself returning to the same lake, going to my previously marked waypoints and catching fish off those exact same spots.
Placement
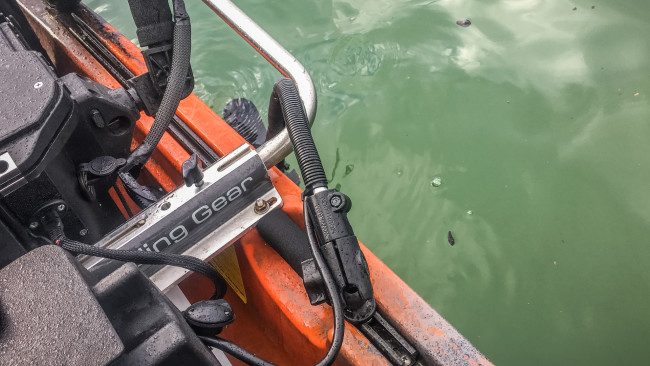
Once you have your unit, you’ll need to determine how and where to set up your fish finder on your kayak. Installation boils down to three components: the graph, the transducer and the battery.
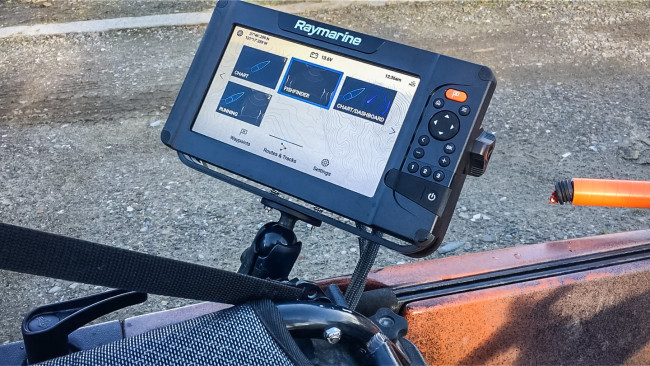
To minimize drilling and wiring headaches, it’s best to keep these three things in the same general vicinity in your kayak. First, figure out where you want to look at your graph, and find a spot where you can easily see it from where you’ll be sitting. Having to constantly lean over defeats the purpose, so make sure it’s close enough to you that, at a glance, you can clearly see all the information it provides.
Check how the graph’s position relates to how you paddle and fish. To do so, temporarily put your graph in its ideal position and sit in your kayak with your paddle, rods and other gear. Pretend you’re paddling or fishing, and see if you bump into your graph. Basically, install the graph in a location that is easy to see but doesn’t obstruct the way you like to fish or paddle.
It seems the days of gluing your transducer inside the hull of your kayak are over. Most, if not all, fishing kayaks now come equipped with dedicated transducer mounting options or removeable dry pods that will keep your battery, transducer and graph all in one convenient spot. So you’ll need to cater transducer placement to your specific kayak.
Power
Once you have your graph and other components in place, it’s time to start thinking about how you’re going to power them.
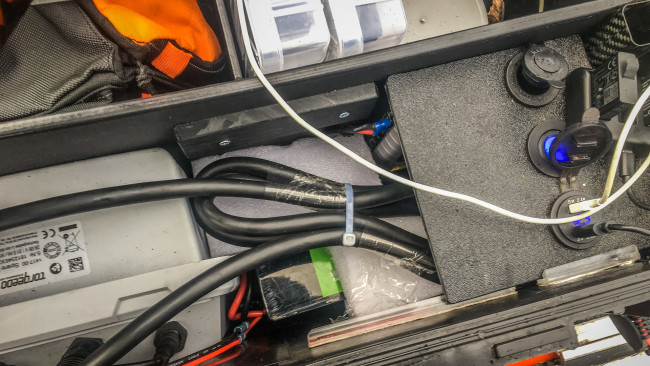
Traditionally, folks will use deep-cycle marine batteries to power their electronics. However, in the world of kayak fishing, lighter is better, and lithium-ion batteries are the way of the future. They pack more power in a smaller package. A deep-cycle battery might weigh up to 50 pounds, whereas a lithium battery of the same power could weigh 5 or 6 pounds.
Many battery manufacturers are recognizing their relevance in the kayak market, and you can now buy batteries ready to go with very little assembly that are near plug-and-play.
My current power setup is a Bioenno 12v 40ah lithium battery that is connected to a small circuit panel. From the panel, I’m able to connect multiple items that require power, including my fish finder and a LiDiVi Dual USB Socket Charger (which was a $20 purchase off of Amazon). Having this setup allows me to charge my cellphone, plug in a GoPro to run all day and have a voltmeter to see how much battery power I’m using.
What it all comes down to
Whether you fish once a month or are an avid kayak tournament angler, there’s no doubt that a fish finder can enhance your experience on the water. Making the right choice can be daunting, but everyone is different and needs will certainly vary. The big thing is to use your graph in a way that is conducive to you, and I promise you it will put more fish in the boat.
Stay safe out there, and tight lines.